Monday, 17 December 2012
How I paintend the flames on my Stormtalon
For the Space Marines Stormtalon I'm building I wanted to do something different then the standard colour scheme and as this is intended ti to a Salamander Stormtalon I got this crazy idea to set it on fire :)
Salamanders love fires so, game wise and fluff wise, it made sense to paint fire on the main hull. I just needed to find a way to do so!
After a couple of days of research, I decided to try to follow a tutorial posted by Buypainted on his YouTube channel. If you don't known this guy please check is channel: he is an amazing painter!
Note 1: please read the entire post before trying this out :)
Note 2: the thinning ratios I give are not set in stone and not an absolute truth but just an indication. Thinning your paints as needed for them to spray correctly in your airbrush
STEP 0 - HOW THIS WORK
A single coat of paint applied with an airbrush has very low opacity: you see what's under it very well.
The main idea here is to use this low opacity to first draw the flames and then tint them in a given colour. We will start from a dark surface (black or near black) and draw an outline of the flames with a lighter colour (white or a light grey). When the outline is complete we will give it colour by going over it with a coat of the colour we have choose for the flames (a green in my case). Then we will repeat this step again using lighter colours.
Note that you cannot do this by going from a bright to a dark colours.
STEP 1 - PREPARATION
For painting flames the Buypainted way you need three things: a surface to paint the flames on, an airbrush and a set of home-made stencils
I use a sheet of plasticard to do colours tests and various experiments like this one. I primed it with the Vallejo German Panzer Grey surface primer, the same primer I used on the Stormtalon. German Panzer Grey is a very dark grey and it's the to-go colour I use when I have to paint something black.
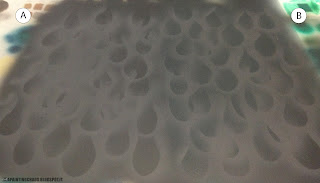
As green is the main colour of the Salamanders Chapter I decided to cover half of the primed surface with Formula P3 Coal Black, a very dark bluish green, to act as a base colour for the green flames and to give a bit of colour to the semi-black base. In the following pictures I marked the two surfaces with a letter: an "A" for the surface with only German Panzer Grey primer on and a "B" for the one with a coat of Coal Black.
The airbrush I decided to use for this job is my Iwata Hi-Line HP-BH, a dual-action airbrush with a 2mm nozzle. I choose the HP-BH for the great control it give you on the paint application.
The last items you need are two stencils to actually paints the flames. A stencil is piece of plastic or paper cut in a given shape that you use to block paint from reaching the surface behind the stencil itself. It's more difficult when said than done: just imagine you cut a star-shaped piece of paper and you put it over another sheet of paper and then spray them with paint. When you remove the star-shaped stencil you will have a perfect white star inside the painted area.
You need two stencil to create the outline of the flames: one with multiple tear-drop like shapes in various sizes and one with a wavy boundary. The first one will be used to draw the base of the flame, the other one to draw the flame "body". I cut mine from a thin sheet of clear plastic: any plastic material will do but avoid paper since it will get soaked with paint pretty quickly!
STEP 1 - DRAWING THE INITIAL OUTLINE
With a medium grey I painted various tear-drop shapes one the surface using the tear-drop shaped stencil. I used a 1:1 mix of Vallejo Model Air (VMA from now on) Dark Sea Grey and VMA Light Grey. I thinned this mix with VMA Thinner using a 1:1 ratio again.
If you have watched is video you will notice that Buypainted uses straight Dark Sea Grey for this step but it when I tried to do so it turned out too dark so I added in a lighter grey
STEP 2 - DRAWING THE FLAME BODY
Using the same colour mix used in the previous step and the "wavy" stencil you draw the body and tip of the flame starting from and extending the tear-drop shape
And this is where I realised I made a mistake :D
I should have thought better where to place the tear-drops in relation to each other to leave space for the flame body and to have more alternation. So I just re-primed the whole thing and started from scratch!
STEP 3 - HIGHLIGHT THE FLAMES
Using a lighter grey then the one used to draw the flame you have to highlight portions of the shapes to simulate lighter / hotter spots. I used pure VMA Light Grey thinned to a 1:1 ratio with VMA Thinner.
Unfortunately I forgot to take a picture of this step: I was a bit frustrated with myself for the mistake I made in the previous step
STEP 4 - TINT IT UP!
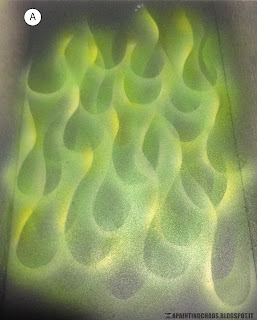
With the flames outline complete it is now time to put some colours down! The first colour should not be very bright so for my green flames I used Vallejo Game Color (VGC from now on) Goblin Green thinned around a 1:2 mix with VMA Thinner
The important thing it that you should spray the colour over the grey outline: the bright grey surface will "give light" to the colour coat you are applying now making it visible over the black background. Some over spray will go over the dark areas but this is OK: we actually want this to happen as this will slightly blend our colour with the background
Notice the lighter green ares: those are the spot where I placed the highlights in Step 3
STEP 5 - ANOTHER ROUND OF FLAMES
Draw another layer of flames over the first one, repeating steps 1 and 2 but using the same lighter grey you used to draw the highlights in step 3. That's VMA Light Grey for me.
STEP 6 - MORE TINTING
Like we did in step 4, we cover this new layer of flames with colour. You must use a lighter colour than the one you used in the previous tinting step. As you can see we are going lighter and lighter with the flame outlines and the tinting colours. I used VGC Escorpena Green (a.k.a. Scorpion Green) thinned 1:2 with VMA Thinner
Spray it over the lighter grey outline you draw in the previous step. The over spray will create the blending with the previous flames
STEP 7 - HOT SPOTS
Put small and soft highlights using a white paint to simulate the hottest spots of the flames. Restrain yourself and don't put them all over the place :)
I used VMA White thinned 1:1 with VMA Thinner
STEP 8 - THE FINAL STEP
Now we have to put down the colour for those hot spots we draw in the previous step. We need a lighter colour then the one used in step 4. Considering that the second green I used was a more yellow-ish green than the first one and that yellow is a component of the Salamander paint scheme is choose to use yellow for the final colour. It's also a good choice for red/orange flames. You just have to follow the progression toward white for your colours selection. I used VMA Yellow thinned 1:1 with VMA Thinner
After this last colour is dry it's important to apply a coat of a semi-gloss varnish to protect the paint jot and to give the flames a bit of shine. I used Vallejo Satin Varnish applied with the airbrush.
THE END RESULTS
Here we have the completed flames over the German Panzer Grey surface:
And this is the version with Coal Black as a base colour:
In the end I decided to go without the Coal Black base colour because the difference was not that big enough to justify an additional layer of paint
I think that this is a really effective way to achieve good looking flames on our models. The important thing I learnt by doing this test and by painting the Stormtalon is that planning ahead is essential.
Hope you like this step by step. Please let me known if you have question or suggestions :)
Etichette:
airbrush,
flames,
Salamanders,
Space Marines,
Storm Talon,
Stormtalon,
Vallejo Model Air
Subscribe to:
Post Comments (Atom)


No comments:
Post a Comment