Showing posts with label review. Show all posts
Showing posts with label review. Show all posts
Wednesday, 26 December 2012
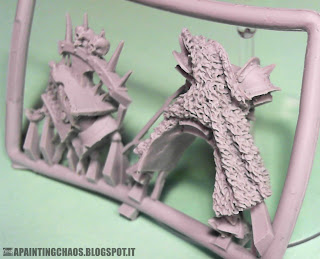
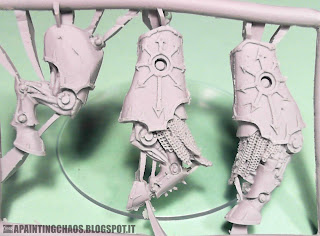
Warriors of Chaos Khorne Chaos Lord on Juggernaut: sprues pictures
Hi guys and gals, I hope you all had a Merry Christmas!
After being reminded in the comments that I still have not posted pictures of the Warriors of Chaos Khorne Chaos Lord on Juggernaut kit I picked up my camera! :)
The kit come in a plain white box from Games Workshop Direct service
After a first general inspection I did not found any major imperfection in the cast. This is the second Finecast kit in a row that I'm pleased with
Nice details on the Juggernaut itself:
I plan to use the Chaos Lord as the leader of one of Bloodcrushers units I'm planning for my Khornate army collection or as a Herald on Juggernaut. It will be a fun kit to build and paint!
Wednesday, 5 December 2012
Wall of Martyrs Imperial Bunker from Games Workshop review
Previously available only in the Wall of Martyrs Imperial Defence Network kit, the Imperial Bunker was recently released by Games Workshop as a standalone product.
WHAT'S INSIDE
Inside a the low profile box, similar the ones used for other Imperial terrains such as the Sanctum Imperialis, you find a single sprue that hold all the kit components... and nothing else!
No building instructions of any sort are provided, not even a brief diagram on the back of the box. The kit is really a simple one so the lack of instructions should not cause to much problems
THE SPRUE
The sprue look and feel like all the others "Made in China" kits from Games Workshop and it hold essentially four walls and a roof with only couple of decorative bits. No floor is provided but there is really no need for it. If you fell so inclined, you could always make one from a sheet of plasticard or similar material.
The front wall is, like you would expect, the most detailed one with it's winged skull and the massed bodies of death Guardsmen piled under the small windows of the bunker
The roof is nicely detailed with the standard "safety floor" pattern usually found on metallic floors or walkways
One of the three doors present in the kits (there are too many of them I think) is located on the back wall along with the set of stairs that lead to the roof and a pile of ammunition boxes or fuel containers
The side walls each sport a door: I think that they may have left one out and used the space for some extra details but this could have been a little impractical considering that this kit was designed to be connected to the others wall sections of the Wall of Martyrs
On the other side of the kit components there are almost no details at all but this is expected as almost all of us would just paint the inside black and be done with it anyway
IS IT WORTH IT?
At 26€ (or 18£ / 33$) the kit is a bit pricey for what we get. It's the same price of the Basilica Administratum, Sanctum Imperialis and Manufactorum kits but with those kits you get a little more to play with in term of number and variety of bits and level of details.
All in all it's not to much pricey (as far as Games Workshop kit goes) so if you need a bunker for your army, this kit is a very good alternative to the DIY route.
Sunday, 2 December 2012
The Vallejo Liquid Gold paints
Since I posted the first few pictures of my Dark Eldar colour scheme, here and in various other corners of the Internet, I got many questions about the Incubus armour and the paints I've used on it, so many that I've decided to make a blog post about this
As you can see in the pictures above, this paints are more brilliant then other metallic colours from Games Workshop, Privateer Press or even Vallejo and this is because Liquid Gold contains real metallic particles that gives the paints their colours instead of the silicate ones found in the other paint ranges.
This key difference is what make Liquid Gold a far superior set of metallic paints but it is also what imposes us a different way of utilisation: this paints do not contains water but use alcohol instead to avoid oxidation (rusting)
THE COLOURS
The Liquid Gold range contains eight metallic paints: silver, copper and six (!) different hues of gold. Like I usually do with all my paints, when I bought this paints I made some little plastic paint swatch (they are very useful when you try to came up with a painting scheme):
From left to right we have Copper, Red Gold, Old Gold, Gold, Rich Gold, Green Gold, White Gold and Silver
Let's just compare them with some other metallic paints:
Again, from left to right: VGC Hammered Copper, VMA Copper, GW Shining Gold, VMA Gold, GW Burnished Gold, GW Chainmail, VMA Steel, GW Mithril Silver, VMA Silver (VGC = Vallejo Game Color, VMA = Vallejo Model Air, GW = the old Citadel range)
That's quite a difference!
HOW TO USE LIQUID GOLD
For using this paints correctly you must follow a basic set of rules and recommendations
1. NO-WATER-EVER
Never, put a Liquid Gold paint in contact with water when it is still in the pot or it is still drying on your model. You will get rust if this happen and probably have to throw away the paint pot and scrap your model
Please note that when I say "water" I also include the water contained in acrylic based paints like the ones we normally use in our hobby. So you could not mix a Liquid Gold colour with one from another range (be it a normal paint, a wash, a ink or something else). However, you can mix two (or more) Liquid Gold colours together, as I did for the highlights on my Incubus
When the paint is dry, and this happens quite quickly, you could paint over it with any kind of paints, be that water based or not
1.5 Let's repeat it
DO NOT USE WATER!
2. They require dedication and a dedicated brush
In the long run the metallic pigments will damage the bristles of your brush so do not use your finest sable brush with this paints, get a synthetic one and dedicate it to Liquid Gold. Also you must use alcohol to clean this brush and not water
3. 96% is good enough!
Until now I just talked about alcohol, without going into detail, but you must use 96% (or more) pure alcohol to avoid rusting. I found that isopropyl alcohol of the same gradation work without problems.
4. Shake well. Then shake again
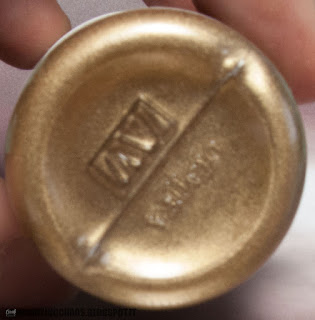
Liquid Gold paints comes in paint pots like this ones:
Every one of them contains about 35ml of metallic awesomeness and come with a child-proof caps like the ones you could found on medicine bottles.
Because of the weight of the metallic pigments, you will always have paint clumped on the bottom of the pot:
The first thing you must do before opening the pot is shake it very well. And then shake it again! Rolling in between your hands also work very well. After a couple of minutes you should end up with something that look like this:
As you can see a bit more than half of the paint deposit is gone but you have to keep shaking and rolling it until you end up with this:
Now all the deposits are gone. And look, you could see the metallic pigments in there!
If you have not used a particular colour for a while, you could find it difficult to dissolve that big blob of metal that is watching you from within the plastic bottle. To fix this, add a bit of alcohol in the pot and stir the paint with a stick
5. Do I paint straight from the pot?
No, you could NOT paint directly from the pot because the alcohol in there will evaporate very quickly.
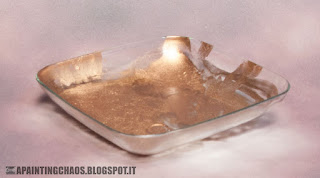
You must transfer a bit of paint from the pot to some sort other container that you will use as a palette and that you can throw away because in the end it will look like this:
It can be recycled a couple of times but no more than that because you will get dried paint flakes into the fresh paint
Also you should thin the paint in the palette with a bit of alcohol because even after all that shaking and stirring the paint is still to much tick to be used right away. I keep some isopropyl alcohol in a dropper bottle and I keep adding a drop of it until, after mixing the paint well, until I could see the metallic pigments swirl
Because alcohol evaporate more quickly than water you will have to add more alcohol from time to time while you are painting. You could also pick up a bit of pure alcohol with your brush and use it to smooth out a layer of tick paint you just put on your model. Be sure to not do this a lot and to not use too much alcohol in one go because it will eat the underlying paints and/or primer.
6. Then could I use Liquid Gold in my airbrush?
Technically speaking with the proper dilution and air pressure you could shoot almost everything with your airbrush but I would say the you should not do it for the following reasons:
- the pigments are bigger then the one found in normal metallic paints so your airbrush will clog more easily
- you must dilute with alcohol and alcohol evaporate quickly, so more clogging and tip dry
- you cannot use water or water based products to clean your airbrush or you will end up with rust in your gun
- if you don't clean it well, the next time you use it with your water based acrylics you will be in trouble!
So I would say that if you could not dedicate an airbrush to this colours you must avoid using them with one.
7. What base coat?
Two or three layers of any Liquid Gold colours will cover well a black primer undercoat but I suggest you start from a layer of colour of similar hue, like a red-brown for Copper / Red Gold or a more yellow one for the other Gold colours. However, a black base coat will work well for Silver
8. Varnish? No, thank you
Vallejo recommend to not put a coat of varnish (any flavor) over Liquid Gold because it will kill it's shine a bit . They also say that there is not need of doing that because Liquid Gold paints are more durable than normal paints
It's really up to you. Just keep in mind that if you apply a coat of varnish you may be need to retouch some of the highlights to bring them back
ARE THEY WORTH IT?
Yes, give them a go!
They are beautiful colours and quite stunning metallic ones. And I got them for around 5€ a pot, a 35ml pot! Compare them to the 3€ / 12ml paints from Games Workshop or the 2,5€ / 17ml ones from the other Vallejo ranges and you will see that there really no reason to not try them
Yes, they are a bit more complicated to handle correctly but the end result is so much better that any time spent learning to use them will repay itself immediately
Tuesday, 27 November 2012
'Eavy Metal Citadel Edge Paint Set review
WHAT'S INSIDE
For 46 € (or 35 £, or 58 $) you get a nice black box that hold 9 Edge colours inside the usual 12ml paint pots, an 'Eavy Metal Detail Brush and a little, twelve pages long, colour booklet
The booklet show us six ways we could use the colours, like painting gems, doing hard edge highlights on Space Marines or Dark Eldar armour but like the recent "paint tutorials" found in White Dwarfs they just don't go in too much details of how things are really done
THE COLOURS
The first thing you notice when you look at the colours is that they are very desaturated and light (as you could expect from colours designed to be the last highlight on your models). They are almost pastel-like
Flayed One Flesh : a bit sandy, but with some red in there
Dorn Yellow : I was expecting some sort of light cream colour but it's more yellowish than that, like lemon cream I could say ...
Krieg Khaki : a light olive / drab green
Gauss Blaster Green : is very similar to Vallejo Foul Green, a very light green, but more desaturated
Blue Horror : a very light blue / grey
Baharroth Blue : this is basically teal. My first impression was of a lighter hawk turquoise
Dechala Lilac : lilac, pure and simple
Fulgrin Pink : a nice pink, with a bit of lilac / purple mixed in
Lugganath Orange : do you know those big pieces of salmon found in supermarkets?
THE BRUSH
The 'Eavy Metal Detail Brush is a Kolinsky sable brush with a good tip, a small belly and it has good snap (the hairs return in positions after being bent). It's not the best brush in the world but it sure is much better than the standard Citadel brushes.
White the tip is good, it's not as good as a fine Kolinsky sable brush can be and for what we pay this brush (more on this later) we should except the best sable...
I took a picture of the Detail Brush together with a Winsor & Newton Series 7 (a size 0). The Detail Brush is the short one:
I took a picture of the Detail Brush together with a Winsor & Newton Series 7 (a size 0). The Detail Brush is the short one:
As you can see, the tip of the Detail Brush is good but not as fine as the Series 7 one. And keep in mind that this it's not a brand new brush like the 'Eavy Metal one
Also, the belly of the brush (the section between the metal corona of the brush and the very tip, this is where the brush "hold" the paint) is smaller: this could be fine but for much less money you could buy yourself a Serie 7 Miniature (shown on the right in the next picture) that sport a belly just a little smaller than the Detail Brush and the same nice tip of it's big brother:
THE TEST
The first thing I did was to put the colours in action on little piece of white paper to see what they really look like: I just picked up a bit of colour form the pot with a wet brush and painted it on the paper
Dorn Yellow is a very nice lemon-yellow indeed but I really can't say how much I like Gauss Blaster Green
Blue Horror will probably make many Space Wolves howl at the moon while I'm seriously thinking to use Baharroth Blue and Dechala Lilac for my Dark Eldar.
Fulgrin Pink is ... pink, but I really don't know what to say about Lugganath Orange.
To make a comparison with the Layers line of colours I tested out in the same fashion also Temple Guard Blue:
It's more opaque and more saturated than, say, Baharroth blue and it was much thicker also
The second test I made was to use the paints as glazes by thinning them with more water then in the previous test:
I used the same quantity of water for all the paints: around 3 parts of water and 1 part of paint for the first step (the big puddles in front of the respective paint pot) and adding two more "parts" of water in the next step (the more translucent layers)
IS IT WORTH IT?
Let's do some math here
This kit come at 46 € while a single paint pot is 3 €. This mean that we pay as high as 19 € for the brush.
Here in Italy I could buy a Winsor and Newton Serie 7 for around 8 € so no, the kit in itself is not worth it.
Would I suggest to buy one or two pots if they get released individually? I would say yes they would add some interesting colours to ours palettes
UPDATE: THE PAINTS ON THE FIELD!
I recently used some of the Edge paints to do the last hightlights on my Eldar Wraithknight. You can see here the completed model.
Here is a list of the colors I've used:
- Baharroth Blue: highlights on the blue areas. The teal / torquoise add a nice hard edge to the azure of the previous highlight
- Blue Horror: the black areas you see on the model are painted in a very dark grey and highlighted progressively with greish blues so Blue Horror was the perfect final stage for those areas
- Dorn Yellow: highlight on the yellow areas
- Gauss Blaster Green: highlights on the green base
Subscribe to:
Posts (Atom)


+test.jpg)

