Sunday, 14 July 2013
Eldar Hemlock Wraithfighter progress 6
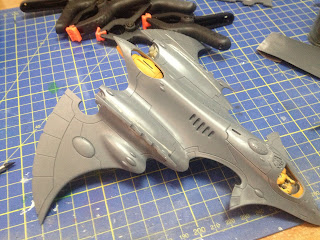
Work continues on the Hemlock! With the yellow sections completed I moved on the black / blue ones. The first order of business was to mask all the painted area to protect them. It took me almost two hours to apply the masking tape, following the many curves of the Hemlock hull.
With the masking tape in place, I proceeded to apply thin layer after thin layer of Vallejo Model Color German Grey
When the German Grey was dry I proceeded to paint the blue areas following the same progression I used on my Wraithknight
Finally, after the blue paint was dry, I unpacked the model!
There are a few spot in witch the masking failed to protect the yellow areas but nothing major.
Next up: highlighting black!
Thursday, 11 July 2013
Eldar Hemlock Wraithfighter progress 5
Yellow complete! Here is the Hemlock after the final highlight steps ...
.. and after I washed it with the midtone yellow to unify all the blendings
Next up: black (kinda)!
Wednesday, 10 July 2013
Eldar Hemlock Wraithfighter progress 4
Hi guys,
I made some progress on the Hemlock yesterday and tonight. After masking the already painted sections I covered the model in white primer.
Tonight I started on the yellow section of the hull. I'm using the same recipe I used on my Wraithknight so the first layer was a mix of Vallejo Model Air Ochre and Wood.
Then it was time for Golden Yellow. Here is a "before and after" kind of picture of the two yellow layers:
With the second layer complete it was time to clean the airbrush before calling it for tonight
Tomorrow I should be able to complete the last two highlight steps of my yellow recipe.
Sunday, 7 July 2013
Eldar Hemlock Wraithfighter progress 3
Work continues on the Hemlock Wraithfighter. For the last stage of assembly I primed the tail section, the cockpit interior, the cockpit itself and the tail engine thingy. When the primer was dry I applied the first layer of yellow. When that was dry, I glued all the bits together and then left the model alone until the glue was fully cured
The next step was to attach the engine pods fins and fill the gaps with greystuff
After that, I did the same for the main dorsal fin
When the greystuff was fully dry, I sanded it and then washed the model again. The Hemlock is currently drying, waiting for the final primer coat.
Friday, 5 July 2013
Eldar Hemlock Wraithfighter progress 2
Hi guys, a quick update on the Hemlock Wraithfighter
All the bits are mould-line free, gap filled, greenstuffed and pinned! And now it's time for a bubble bath ;)
As you can see I'm keeping him in pieces as I'm going to paint it in stages like I did for the Wraithknight
Subscribe to:
Posts (Atom)


